Friday, October 30, 2009

Furniture Feature Friday

Happy Friday!
This is one of my favorite makeover projects. This was the ugliest china cabinet ever. The previous owner wanted to just throw it away but I talked her into giving it to me . I painted it a mustard yellow and added a few knobs from Anthropologie and Walla!!!!  I love the way it turned out. But, I am so bummed out that I didn't take a before picture.

Stop by Miss Mustard Seeds blog to check out more Fabulous Friday Makeovers!!


I hope everyone has a safe and fun Halloween!
Stephanie

Thursday, October 15, 2009

Halloween Costume Ideas

If you are like me you're probably scrambling to find a cute last minute Halloween costume. Here are a few that we came up with over the years. Some are store bought, some are homemade, and some are a little of both.

This is probably my favorite costume of all time.
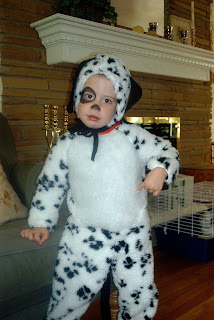
 Rowan loves animals, all animals and she loves her webkinz. 
So, I made her this cute little puppy costume.
 The little prize button on her chest reads "Pick of the litter."
This was very easy to make. The top is a white hooded sweatshirt 
with patches of white and brown fur sewn on. I made the ears from 
white and brown fur that I sewed together
 like you would if you were making a pillow. I added a few pipe 
cleaners to the ears to make them stiff
 and I added them to the hood with a few stitches.
 The bottom is just brown sweats and brown fuzzy slippers. 
This costume is not only cute but also comfy, warm, 
and easy to run around in collecting candy.


Hippie
This was an easy one too because we had
everything at home except the glasses and the peace necklace.
Zoe is so creative....that is a belt around her head!


Of coarse, a pirate. 


We had the dresses but I can't remember where we got them. 
I do remember going to World Plus Market and getting the umbrella,
 shoes, and chop sticks for their hair.
Adding black eyeliner and bright lips finished it off.


Too cute


Don't forget little details like painting on a little black nose or whiskers.
 I just used my eyeliner. I think it stays on better.


Zoe was mad this year because everyone kept telling 
how pretty she looked and she wanted to look scary.


They made themselves look like BOYS. 
I love the attitude they used to pull off the look


Rowan wore her sisters cheerleading uniform.


An ipod
This is my second favorite costume but I don't have any photos to show you. 
Zoe and a group of her friends made these together. 
Each one of them was a different color ipod. 
We made sandwich boards by adding elastic straps.
 Hint: make sure you don't put them too far apart or they slip off of their shoulders.
 Finish the look off with white turtlenecks and leggings.


I thought that I would add in this little cute little Halloween craft 
idea that my daughter did at her school last year.
They had tons of white sheets and white cotton fabric ripped up. 
The kids glued them on, added black marks and eyes.
Easy and cute!


I hope I gave you a few ideas for Halloween or at least inspired you to create something at home yourself. I had fun looking through my old photos, seeing how cute my girls looked when they were little, and seeing how much they have changed over the years. (sniff, sniff) They grow up too fast.


Have a safe and fun weekend,
Stephanie

Tuesday, October 13, 2009

Before and After

Photobucket
After four long years we finally finished our "to do" list on the front of our house. When we moved in, the amount of work needed to be done was overwhelming. We bought the worst house on the street, knowing that it needed a lot of work. Although we still have a ton to do inside, I feel relieved to get the outside finished.


Photobucket
Our old garage door no longer worked. It was stuck in the down position! 
We even had to take the lawnmower out the front door. Ugh!


Photobucket
The front garden was overgrown everywhere and ivy had taken over.


Photobucket


Photobucket
The sidewalk and the driveway were cracked and crumbling.
 Really, they looked way worse in person.


Photobucket
Thanks to the September wind storm, we were able to get a new roof.
And yesterday, we had our new carriage style garage door installed. 
I couldn't be happier. 


Photobucket
We added a paver, rounded front step and an extra wide sidewalk.


Photobucket
Photobucket
Under the large tree we planted many different types of hydrangeas.
 Hopefully all will grow the way that I planned.

Thank you for taking the time in your busy day to visit my blog. I appreciate every comment,   follower, and visitor.
Stephanie


Thursday, October 8, 2009

Glittery Halloween

This post wasn't viewable to some so I deleted two photos and tried again. I thought maybe it was too long... but it wasn't. It turns out that I accidentally added a "page break" at the top of my post so it pushed everything to a different page. Go figure. It took me forever to figure that out.
Happy Thursday everyone!! Well, Friday now...
Here are a few pics of my Halloween displays in my living and dining rooms. Have you ever noticed that some displays are extremely hard to photograph no matter how much you try? I tried taking them in the a.m. and p.m., with flash on, with flash off, and every other way I  could think of. I think having the glass domes and the mirrors make it difficult because of the glare.  So, if anyone knows any good tips on how to photograph around mirrors and glass domes, let me know. I could really use the help. 
Well, here's what I ended up with.


Take care,
Stephanie

Saturday, October 3, 2009

Glitter Pumpkins

Here is a quick little Halloween decorating project for you. I know glittery pumpkins are nothing new but I wanted to show how easy it really is. It literally took me 4 mins. to complete (not including drying time). Have all of your supplies ready before you start.


Photobucket
Pour some Elmer's glue into a container and add a little water to thin.


Photobucket
As quick as you can, put the glue over the entire pumpkin. Work quickly because the thinned glue will sometimes dry fast.


Photobucket
You don't want to do it in sections because the glitter will clump up and you won't get a smooth finish. (I like Martha Stewart's glitter.)


Photobucket
Add a little glitter to the bottom of your tray( so when you sit the pumpkin down, the base of it gets covered instead of smeared) Then, starting from the top add glitter moving in a circle all the way to the bottom. Allow plenty of drying time. Especially if you are putting it under a glass dome. It will fog up the glass if still wet.


Photobucket
Photobucket
There you go! Now your glittery pumpkin is ready for display.


Happy decorating,
Stephanie

If you are ever in Milford, OH...

come see my booth that I share with my friend Brenda. 
The Mercantile Mall
100 & 104 Main Street
Milford, Ohio 45150